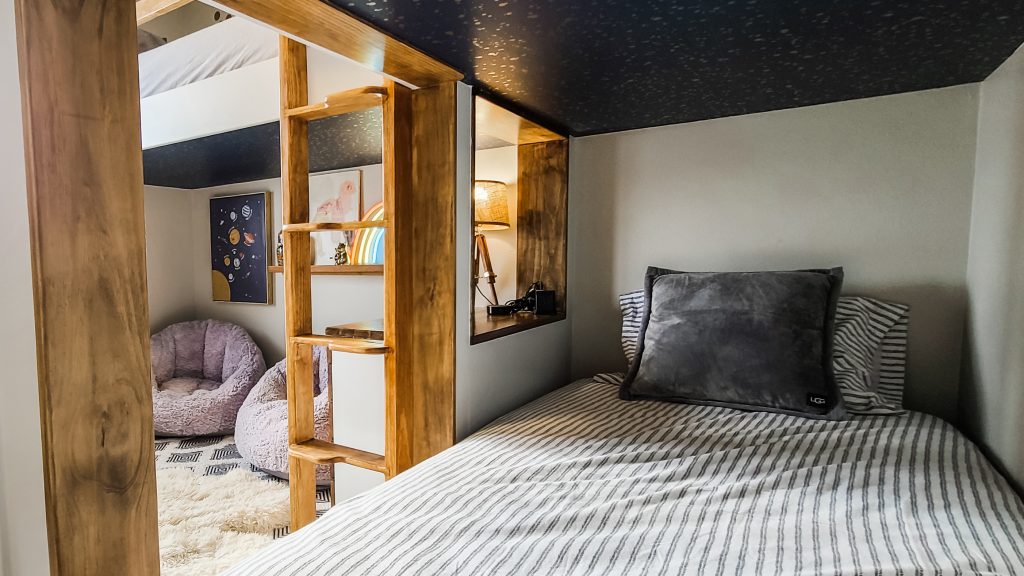
Constructing your own built-in bunk bed can be an enjoyable and fulfilling DIY project. It can also be an excellent way to save money compared to purchasing a pre-made bunk bed. Additionally, it allows you to customize the design to fit the specific needs and style of your home
By carefully planning and paying attention to detail, this DIY bunk bed can be a suitable solution for various needs. Therefore, whether you want to save space in a small bedroom, or create extra sleeping areas; these bunk beds can be the answer. By building the bunk bed yourself, you can tailor the design to meet your specific needs and style preferences. The final product will be a practical and attractive piece of furniture for your home
The 3 benefits of using bunk beds in a bedroom

Versatility
In the past nine years, we have constructed a variety of bunk beds for our children. These have included bunk beds we designed for our school bus conversion, a loft above two cribs, and our most recent bunk bed project; triple bunks for our girls’ bedroom.
Bunk beds can create extra sleeping space and also various areas in a room for various purposes. As a result, this versatility makes them suitable for a range of situations.
Maximize space
Bunk beds are also an excellent way to make the most of a small bedroom. They allow you to utilize vertical space in the room to create additional sleeping areas. By building your own bunk bed, you can design it to fit the specific needs and dimensions of your space. This results in helping you make the most of the available room. They can be especially useful in situations where you need to squeeze multiple kids into a small space or when you want to create extra sleeping areas for guests.
In addition, the use of built-in bunk beds can create a loft area, reading nook, or even just a place to relax and hang out in your bedroom. As a result, helping you make the most of the available space.
Customizability
When it comes to customization, DIY bunk beds offer endless possibilities. By building your own built-in bunk bed, you have complete control over the design. Therefore, you can tailor it to fit your specific needs and style preferences. You can choose the materials, size, and features that best suit your needs. So whether that means adding a ladder or stairs, incorporating storage options, or more, this give you customizability options.
You can create a DIY built-in bunk bed that perfectly fits your needs, dimensions and style of your home. So whether you’re looking for a functional and practical bunk bed, or something more stylish and unique, the customization options are endless with a DIY built-in bunk bed.
Inspiration for designing a DIY triple bunk bed

We initially purchased our home as a family of four. However, as our family grew, we found ourselves in need of more space in our home. With only three bedrooms and two adults and four kids, we knew that we would have to do some room rearranging in order to accommodate everyone.
Therefore, in order to maximize the use of space, we decided to look into options for fitting multiple kids into one room.
It was tough to find ideas for a DIY triple bunk bed. There was plenty of inspiration on Pinterest and blogs for awesome DIY bunk beds. But I struggled to find anything specifically for a triple bunk bed.
So after seeing the success of the bunk beds we built for our school bus conversion, we decided to design and build our own triple bunk bed. By customizing a DIY bunk bed for our three girls to share, we could achieve a similar functionality.
With four kids, it was important to make the most of the available bedroom space in our home. This triple bunk bed design allowed us to maximize the use of the room while still providing each child with their own sleeping area.
The design
To meet our requirements, we designed a triple bunk bed that provided each child with their own individual bed and a sense of personal space. The design was meant to be timeless and able to grow with the girls, so they wouldn’t outgrow it in a few years.
Then, in order to make the most of the bedroom, the bunk bed was designed to utilize the vertical space in the room, This allowed for three beds to fit comfortably without making the room feel cramped. By carefully considering the needs of our children and the space available, we were able to create a bunk bed design that was functional, stylish, and suited the needs of our family.
One of the great things about a DIY triple bunk bed is that it’s not just for families with three kids in one room. The loft area could be used as a reading nook or play area that would be enjoyed by children of all ages. Even if you don’t have three kids, this design could still be a useful and fun addition to your home.
This post contains affiliate links, which means I may earn a small commission if you purchase through them—at no extra cost to you. Your support means the world and helps keep this blog running. I only share products we actually use and love, and I’ve included them here for your convenience. Thank you for supporting our journey!
What you need:
- drill
- chop saw
- level
- skill saw/table saw
- brad nail gun
- tape measure
- orbital sander
- sandpaper
- wood filler
- putty
- caulk gun/caulk
- Gripper primer
- paint the color of your choice- semi-gloss
How to make a triple bunk bed
Step 1: Frame the structure

Using 2×4’s, you are going to frame out your structure. Begin with framing your bunk and finish with framing in the 3rd bed; the loft.
With some trial and error, what ultimately ended up working best for us was building the 4-sided bottom bunk mattress frame first. Then, attaching those to the studs in the wall using bolts, we built from the bottom up. Finally, by constantly checking our measurements and whether it was level, this helped us to avoid timely mistakes.
Step 2: Trim out the bunk bed

With the structure framed, it’s time to trim out the bunk bed. For the inside walls, beds, and ceiling, we used plywood. Then for the remaining surfaces, we used select pine. We chose select pine on these other surfaces because we figured these would be the areas that would endure the most wear and tear. Knowing that, we felt the pine would hold up better.
Finally, we knew dings, scratches, etc. are easier to remove with a light sanding that you can do on pine wood and then reseal vs. breaking plywood.
One way to customize this DIY triple bunk bed is by adding a built-in dresser or desk. While you could leave the bottom bunk open, adding a dresser or table provides additional storage and a bedside table for the bottom bunk. This is a great way to make the most of the space and add some extra functionality to the bunk bed.
Step 3: Use Caulk, wood filler and paint putty

When building a DIY triple bunk bed, it’s important to take care of any imperfections in the wood. Wood filler, paint putty, and caulk can all be used to correct these issues. For areas that will be stained, it’s best to use wood filler to minimize visibility. Paint putty is better for areas that will be painted, and caulk is a good choice for filling cracks and smoothing out any rough edges. By taking the time to address these imperfections, you’ll end up with a finished product that looks professional and well-made.
Step 4: Paint

After our experience painting our school bus conversion and seeing how the interior paint held up over the year despite the abuse from our large family and animals, we are convinced that these are the best products to use for painting.
I particularly love using this primer, which was recommended to us by a professional painter who assisted us with spraying the interior of the bus.
We have always used the Sherwin-Williams line for all our painting projects and have never had any complaints about their products. They seem to withstand intense wear and tear and are easy to clean as well.
Step 5: Make your ladder and railings

After completing and painting the triple bunk bed, we moved on to the final touches: the ladder and railings.
We used select pine to design and build this ladder, which provides access to the top two bunks. It is strong enough to hold the weight of an adult, and we believe it provides a safe and fun way for the older children to access their beds.
Fun fact: following a Brazilian old superstition, we designed the steps to end with your right foot hitting the floor first every morning. This is said to start your day off right and bring good luck.
Finally, with the ladder in place, you can add any railings you feel are necessary. This is largely a personal preference that depends on the age of your children and your own comfort level.
For our children, we added a single long railing on the loft bunk bed. The design of the second upper bunk includes a built-in “railing” with the pony wall separating the upper bunks, as long as the child sleeps with their head in the correct direction. Alternatively, you could use more select pine wood to create railings on the second upper bunk bed.
Before & After

Before starting this project, the bedroom was small and didn’t have much functionality. However, after building the ultimate DIY triple bunk bed, the room has been transformed. It’s amazing how much of a difference a custom piece of furniture can make in the look and feel of a space.
If you’re looking to maximize the space and functionality in a small bedroom, building a DIY triple bunk bed could be the perfect solution. With some careful planning and attention to detail, you can create a unique and practical piece of furniture that your family will love.


Finishing touches
Here are the links for the things I used in this bedroom renovation that we love!
I hope this helps to give you a few ideas on how you can incorporate bunk beds into your room and transform the space!
Looking for more inspiration? Make sure to check out more DIY projects below!
- DIY faux mercury glass mirror
- DIY floating shelves
- Built-in double bunk bed (Coming Soon)

XO,
Morgan


1 Comment
Hey. Do you have the dimensions of this. Bedroom? Love that you’ve got all these beds here. Would during if my tiny space would accommodate the same thing .