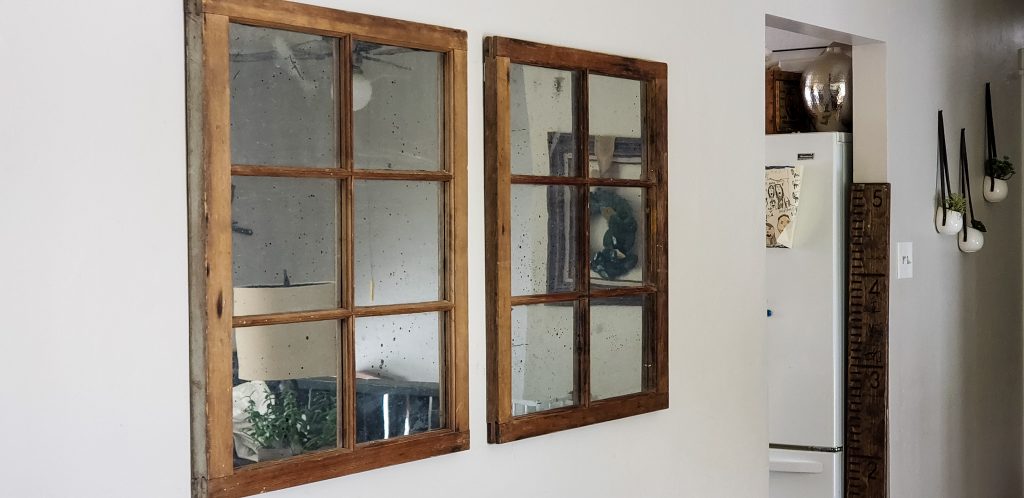
Anyone else love Pottery Barn or Restoration Hardware but maybe not the price tag? I always seem to be drawn to all those amazing decor pieces that have the expensive price to go along with them! One of my favorites are their variety of mercury glass mirrors. So I was excited when I found a hack to get that same look of their mercury glass mirrors without the high price! I needed to share this easy DIY with you because I love how it turned out! So if you love the look of these high-end mirrors, then keep reading for the step by step tutorial on how to make this faux mercury glass mirror for a fraction of the cost!
What is mercury glass?
Mercury glass, also known as silvered glass, in reality, contains neither mercury or silver! It actually is composed of two panes of glass with a silvering formula inserted between the two panes.
A combination of a mirror and silver look, over time it acquires a “crumbly” appearance. It creates an effect that adds a fun pop in home decor, Christmas decorations or in a mirror such as this 😉
Making your own mercury glass mirror

A mercury glass mirror is a great addition to your home decor whether hung above a mantel, on a wall or placed on a shelf. This method will leave you with a reflective aged or antique mirror look. Full of character, this will be sure to be an eye-catcher and a gorgeous alternative to a standard mirror!
Find your window

Any window or door with glass will work for this! If you watch the sides of the roads, people often will put out free windows that they are getting rid of! Or check local thrift or antique stores. I happened to come across these from a local downtown Bozeman business. They were actually the original windows from the restaurant of a friend of mine! I love the little bit of history that goes along with a DIY project like this one!
The mixtures of the wood, with the silver mercury glass, will leave you with a stunning result.
This post contains affiliate links, which means I may earn a small commission if you purchase through them—at no extra cost to you. Your support means the world and helps keep this blog running. I only share products we actually use and love, and I’ve included them here for your convenience. Thank you for supporting our journey!
What you need:

- Rustoleum mirror effect spray paint ( Keep in mind these cans are small! So order accordingly)
- Matte black spray paint
- Gold spray paint (optional)
- Short, wide-rimmed cup (for water/vinegar mixture)
- Water – 1 cup
- Vinegar- 1 cup
- Painters tape
- Butcher paper
- Painters Tarp
- Paper towels
- Wall Dog screws
- Sawtooth picture hangers
- Sandpaper (optional)
- Stain (optional)
- Rustoleum chalk paint (optional)
If you want to avoid a store run and have all the items shipped straight to you, here is the complete list of what is needed to complete this project! Place the order and have your box full of goodies arrive at your door in just a few days!
Directions:
Step 1: Prep your window or door

Take a look at what you are working with. Does it just need to be cleaned to knock off the years of dirt and chipping paint? Or are you planning on sanding and staining or painting it?
The windows I used were original windows from a historic building, and so I didn’t want to change them but they did need a good cleaning!
However, if you plan on sanding and either staining or painting to get the exact finish you want, here are my favorite tips on doing that!
If you find a window that you like the shape of but aren’t in love with wood finish, try using chalk paint! I used it recently on a table in my craft room and LOVE how it turned out! Rustoleum chalk paint is a great way to add a pop of color without the cost of other chalk paint brands.
Whichever direction you go with, make to clean your window well! You won’t want the grit from the wood to transfer to the glass as you are making your mirror and affect the finished product.
Step 2: Make your water & vinegar mixture

In a short, wide-rimmed cup that your hand can fit in, make a 50/50 mixture of normal temperature water and vinegar. I did a cup of each. Set aside.
Note: you can use a spray bottle. I did the first time I did this project…which was a major flop btw! It resulted in my husband spending hours with a razor scraping off the glass.
But I liked the hand effect better for the water/vinegar mixture. It resulted in a more natural effect with water droplets in varying sizes.
Step 3: Tape off the wood frame surrounding the glass

This is the most time-consuming step of the process, but the end result will be worth it! Take the time and using painters tape, tape off all the wood surrounding the glass.
I used just painters tape for the small wooden sections and then I used butcher paper strips to cover the larger frame sections held down with more painters tape.
Again, make sure you are taping the BACK of the frame.
Step 4: Clean the glass

Choose your favorite glass cleaner and get that glass really clean. Any specs that are left on the glass will keep the mirror product from adhering to the glass and leave specs on your final product. Make sure to clean both sides of the glass.
Clean the front of the window FIRST and the backside of the window ( the side that will be facing the wall LAST! As the back is where you will be spraying and you want that cleanest!
Step 5: Splatter water and vinegar mixture

Using your hands, dip your fingers into the cup of the water/vinegar mixture and splatter onto the glass/glass panes. How much or how little you use is up to your discretion.
I found that I liked the result of a small amount of splatter over the entire glass. Then in certain areas such as the corners or at random, I would splatter more heavily to create a more authentic mercury glass look for the final product.
Step 6: Spray first coat of mirror

IMMEDIATELY after you have splattered the mixture, spray your first coat of the mirror spray. You want to do this BEFORE the water/vinegar mixture has had a chance to dry!!!
Following the directions on the spray can spray a light coat on all areas of the glass in a sweeping left to right motion.
Step 7: Let paint dry

Allow the mirror spray paint to dry. It goes on shiny silver and as it dries, you will see it transform fairly quickly to a foggy/matte gray color when it dries.
Step 8: Spray a second coat of mirror

After the entire surface is a matte gray color, you are ready for a second coat. Again following the spray paint can directions, apply a second coat of the mirror.
Step 9: Splatter water and vinegar mixture

Again, using your hands, dip your fingers and at random splatter the mixture over the glass.
Try to do this in different areas than before.
Step 10: Spray third coat of mirror

IMMEDIATELY before the mixture dries, spray your third coat of the mirror spray.
Step 11: Let it dry
Letting it transform from shiny silver to a matte gray, let the coat dry. You will notice that there will be wet “bubbles” where the mirror coat is covering the water mixture droplets. Don’t worry about these drying.
Step 12: Blot it

Before: Notice the bubbles? That is what you are dabbing with the paper towel. 
After
Using a scrunched up paper towel, GENTLY blot up the water mixture droplets. This will create areas with no mirror coat and you will just see the glass which is what you want. Depending on the look you are going for and your personal taste, you can GENTLY rub a corner of the paper towels at random over the glass to create a scratched look.
BE CAREFUL to not scrub with the entire paper towel or you will remove too much of the mirror spray and will lose the great effect that you are working towards.
Step 13: Repeat Steps 9-12 two more times
You know the drill by now:
- Splatter water/vinegar mixture
- Spray the mirror coat
- Let it dry
- Blot
Step 14: Add a coat of gold (OPTIONAL)

Although this step is optional, I like the look of the flecks of gold in the final piece.
To add this to yours, simply repeat steps 9-12 one last time but replace the mirror coat with a coat of gold spray paint.
After you have blotted the back one last time, you are ready for the final step.
DO NOT DO THE WATER/VINEGAR STEP AGAIN!!!!!
Step 15: Add a final coat of black spray paint

Last but not least, spray a thin coat of black spray paint over the entire glass area. This is the final step. No more mixture or blotting. This will cover all areas of the glass left and create a “backing” to the mirror!
Final steps

Now your mirror should be done! Gently peel off the painters tape while the paint is still wet. Allow the paint to dry completely taking care that nothing will touch the back part of your window before it is dry.
Add 2 of these picture hangers to the back and you are ready to hang it up! If you want the easiest way to hang up anything on your wall with no need to find studs or pre-drill….then you need to get these Wall Dog screws. They are my FAVORITE! I can’t tell you how many extra holes in the wall they have saved me from 😉
That’s it! You should be left with an awesome mercury mirror for a fraction of the price! I love how this one turned out with the natural wood. But it was so easy and the result was amazing; so I’m planning on trying it again but this time using chalk paint for the frame!
See, even my youngest likes my mirror 😉
What projects have you tried this method out with? Share your pictures in the comments below! See, even my youngest likes my mirror 😉
XO,
Morgan


2 Comments
If you’re not going to see any of the back part of the window/mirror if it’s hanging on a wall, why do you have to tape it off?
I taped it off only because of personal preference. I wanted clean lines and for it not to cover the wood. So not necessary, just personal preference! 😉