


Our home
Hey friends! As some of you know, we moved into our first home a couple years ago. We LOVE this house. I know many people get excited about getting a bigger house, and with that, larger square footage. For us, it’s less about the size, and more about the space. We were looking for a home that had rooms that fit our needs; and we found it through the help of a friend!
The couple we bought the home from, we’ve since become friends with. They had done a fairly extensive renovation previously. So the home was already updated and extremely well taken care of.
Because of that, we get to take on the fun projects to make it “ours”. So far we are having a ton of fun with that! Whether to my hubby’s excitement or dismay ( I’m not always sure ;), the “hubby-do-list” is always growing. It seems like we cross one off, and I find five more on Pinterest I want to do 🙂
DIY floating shelves

Some of my favorite projects we have done are floating wooden shelves. They are an easy project that adds a great deal of character to a blank wall. The element of the wood also warms it up and makes it “homey” in my opinion.
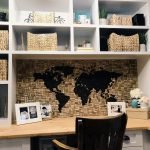
I have been looking for the perfect practical solutions for our master bathroom since we moved in. Because, well, its not quite, “master :)” It’s tiny 🙂 After adding floating shelves in both our kitchen and other upstairs bathroom, I decided these would be a great solution for above our toilet.
The top shelf would be perfect for my favorite thing in the world after my family; photos. I chose a over-sized frame that would fill the large empty wall space behind the top shelf as well as small decor items. The bottom shelf was the perfect spot to hold a few commonly used bathroom items in a decorative way.
These DIY faux floating shelves are a perfect inexpensive addition to any space, adding needed character and warmth. They also provide a practical storage solution for your space.
So grab your tools, and let’s get these shelves whipped out so you can spruce up your walls!
This post contains affiliate links, which means I may earn a small commission if you purchase through them—at no extra cost to you. Your support means the world and helps keep this blog running. I only share products we actually use and love, and I’ve included them here for your convenience. Thank you for supporting our journey!
Supplies you’ll need:
- Sander (hubby’s favorite is an orbital sander)
- Sandpaper – 100 grit for rounding out the edges, 150 for smoothing & 220 grit for finish
- Wood Stain – I used Minwax’s Dark Walnut. (If you want a little lighter color, try Special Walnut Stain
Paintbrush– Stain Pad – This is for applying the stain.- 2 Corner Braces (PER SHELF) – I used the Everbilt 4″ metal corner braces. (to secure the shelves to the wall)
- 8 (PER SHELF) – 2 1/2″ Construction countersunk screws
- 8 (PER SHELF) – 3/4″ Wood countersunk screws
- Lumber – 2″ (actual 1.5″) X 8″ (actual 7.5″) X 10ft wood board (cut down to size)
- Black spray paint (to paint the corner brackets)
- Level
- Drill
- 1/8″ drill bit (for wall screws)
- 3/32″ drill bit (for wood screws)
- Drywall anchors (optional) – to make sure your shelves are sturdy in case you aren’t drilling into studs
Getting Started
Step 1 / Measure & plan placement

As excited as you probably are to rush to Hope Depot to buy your supplies and get started, slow down just a little 🙂
The first thing you will want to do is measure the space and plan out how many shelves you are wanting to do. So grab your measuring tape and figure that out. For goodness sake, actually write it down and don’t try and remember it 🙂 You’ll end up forgetting when you get to the store and are trying to do the math to see what boards you need 😉 The last thing you want to do is get home and realize you didn’t buy the right number or got the wrong size and have to go back. I am speaking from experience here 😉
I knew I wanted two floating shelves. Since they were going above my toilet, I measured so that they would be just a bit wider than the toilet tank, and several inches from anything on either side.
You will also want to plan out what you think you will be placed on the shelves so you know how much space to keep between the shelves. If you are planning on putting frames or any taller items, you want to make sure that there is ample room for the item (plus around 2″ from the top of the tallest item to the bottom of the next shelf).
It may not seem important at this moment but the last thing you want is to spend all this time making, go to decorate and realize the items you envisioned using won’t fit.
Step 2 / Get your lumber

I still remember one of my best friends telling me Home Depot was her favorite store….
I didn’t get it at the time. Now, I 100% agree 🙂
Time to get your lumber! As you decide where to get it, keep in mind that the beauty in getting it from a hardware store, such as my favorite, Home Depot, is that they will cut it for you. FOR FREE 🙂
This is my favorite thing ever. I’m not the most patient person. As soon as we start a project, I’m already itching for it to be done. Like yesterday 🙂
Having them cut it for you in store means it will fit in your car easily and when you get home, you are ready to jump in and start making your shelves!
I chose to get a single piece of 2″ x 10″ x 10ft pine. When they cut it for me in store, I was able to to get two shelves plus an extra piece out of it. This method is cheaper than buying pre-cut options.
Prepare your shelves
Step 1 / Cut your wood

If you chose to have it cut when you bought it, you get to skip this step! Otherwise, time to get it cut to length. Personally, even though we have all the tools at home to cut it; I’m all about simplifying. So I would suggest taking advantage of the help and having Home Depot make the two simple cuts for you.
Step 2 / Plane your wood (optional)

Shhhh! Don’t tell my hubby I used his tools on the garage floor! 😉
Do you have to do this step? Not necessarily. But if you have a planer, its worth the 10 extra minutes of work.
Why
What planing does is when you buy a long piece of wood, more often than not, the wood is a little warped. Sanding will remove the roughness a little, but not as much as planing.
How
To plane the wood, place it in the feed, and adjust the height of the planer to be a tiny bit higher than that of the wood. Start with the crown side facing up (bottom side should be the cupped side since you want the side with two points of contact touching the feed base of the planer first). Pass the wood through on one side until it is flat.
Think of your wood as a letter “C” if it is cupped. Look at your board from the ends. When you make the letter “C” with your hands, the tips of your fingers are the points that you want touching the feed base. Hold up your board again, find the “C” and turn the board clockwise so the points are facing down
Once the first side is flat, flip the board and then turn the knob. This lowers the planer and you are ready to once again pass the wood through on both sides.
I did this about 4 times on each side of the shelf. But every piece of wood will be different. Use your best judgment and when you feel the shelf is flat enough to hold your items without them rocking, then you are good to go on to step 3 🙂
Step 3 / Sand

We were out of sanding disks for our orbital sander, and so I made do with this one 🙂
I am the first to admit, I am not the biggest fan of sanding…..in fact, I really really really dislike it 🙂 However, it is the most important step of most projects. Especially any project you want to last and will be applying stain to it.
Why
This part of the prep work smooths the surface of the wood. This will give you a uniform surface which will yield a better quality finish regardless of the finish you apply. Basically, this step will leave you with a professional looking finished product!
An orbital sander is your friend
This step can be done with a hand sander, but it will take forever. However, if you will be doing more than just a couple of home projects, I can’t recommend enough going with a power sander. It will pay for itself in all the time and frustration it will save you. This is
Any time you sand wood, start with a lower grit paper ( 100 grit ). Work your way up to finer grit (ie. higher number). The low grit sandpaper removes any wood slivers and does the grunt of the work. Use a 100 grit to round out the edges of the shelves. Move to a 150 grit for sanding the faces and sides of the wood smooth. This is a good grit to transition between the shaping done with the 100 and the finishing with the 220.
If you were to skip straight to the 220 grit, you’d be wasting a lot of the 220 grit sandpaper to smooth it out instead of just finishing the surface. Lastly, use a 220, finer grit, for finishing the sanding. You will want to make sure to sand the rough ends of the wood as well!
Cleaning
After you are finished sanding, clean off all that sand dust WELL! You’ve taken all the time to get the wood prepared to stain. The last thing you want is particles of dust left that will create a bumpy finish as you apply the stain if it isn’t all removed. Take your time with this step.
Start by vacuuming off the bulk of the dust. I always use a shop vac for this. As tempting as it might be to grab your house vacuum, don’t. A shop vac is meant to vacuum up larger particles and pieces and is less likely to get clogged. The remaining dust will be a breeze to remove with these Tack cloths. They are a tacky cloth that remove particles really well and don’t leave much behind.
Take extra time to make sure you do this part thouroughly. It will pay off in the end, promise 😉
Step 4 / Stain

Goof up on my part. I used a brush, which will work. But you are better off using a stain pad!
You’re almost done with the shelves!
Last step is the staining. There are a variety of stain finishes, this is the one I used on my shelves.
For how to apply the stain, FOLLOW THE DIRECTIONS ON THE STAIN CAN! This will help you to achieve the best results as directions can vary.

Keep in mind, this step is messy! Grab some cardboard or a tarp to put under your shelves. Then elevate the wood off your surface with these awesome Painter’s Pyramid Stands.
They are great because they allow you to stain the entire piece of wood at once. This is quicker than waiting for one side to dry before staining the other.
Plus they are perfect to be be re-used time and time again for all your different projects.
Again, not a necessity, but stain is messy. I always choose to use these gloves when I’m staining anything. They are inexpensive and keep my hands relatively clean. Then once I’ve finished, clean up is super simple with just tossing them.
Applying the stain
The easiest way to apply stain and end up with professional results are these stain pads. They are easy to use, and unlike brushes they won’t leave brush marks. Well crap….because guess what I used? A paint brush.
I guess this is one more lesson on why I should not be so stubborn and ask hubby for help sometimes. I thought the brush was fine and was all proud of myself for doing this project alone while he was at work. Apparently with stain, you have to be very careful to apply in the direction of the grain (lines) of the wood. By using a brush, you are more likely to end up with brush marks. I just learned this as I was having him double check my post directions, since he is the builder in our house. Oops.
So, learn from my mistake 🙂 Go with these pads!
Keep in mind, that most stains need to be wiped off before they dry. The longer you leave the stain, the darker the finish will be. I set a timer for 5 minutes before wiping, and for me, they turned out a little too dark. Next time, I will do 2-3 minutes and then wipe! You can always do a little longer on the second coat if it isn’t dark enough for you!
For wiping off the stain, grab a package of clean rags like these. These will be easiest to use because they won’t tear as you wipe off the excess stain that hasn’t absorbed into the wood.
Step 5 / Paint brackets

As you are letting the stain dry, now is the perfect time to paint those brackets! I love the finished look of this paint. It has more of an industrial look vs. a shiny, perfectly smooth finish. The finish is similar to a hammered metal look. I love it!
The easiest/cleanest way to do this is using a cardboard box. Lay out all the brackets, and stick your screws point down into the cardboard. This will allow you to quickly spray and get an even and full coverage of everything.
Follow directions on the spray can, and after allotted dry time, spray a second coat.
Mount your shelves
Placement of Shelves
Step 1 / Use level

Besides sanding, in my opinion, this is the second most important step. Take your time, measure TWICE to make sure you drill in the correct places so your shelf is even and LEVEL!
If at all possible, do this step with a second person. The extra set of hands will make it easier to do this right the first time.
Decide where you want your shelf on the wall. Make a mark with a pencil. There are many methods for this next step. Easiest I’ve found so far, is grab your level, line it up on the mark and get the bubble centered. Once you have that, take a pencil and using the level, draw a line across the wall.
You can then repeat these steps where you want to place the second shelf.
Keep in mind, you are measuring for where the BOTTOM of the shelves will be. Make sure you measure consistantly so that the shelves end up the proper distance apart that you were striving for.
Step 2 / Find Studs ( or use wall anchors )

Now that you have your two level pencil lines on the wall marking where you want the shelf; it’s time to find the studs so you can get the brackets up!
Using a stud finder, pass it along the pencil line until you find the stud. Make a vertical mark on the wall and repeat a second time to find placement for the second bracket.
If you can’t find a stud, you will need to use wall anchors before drilling screws.
Step 3 / Hang brackets

The brackets are visible until you add decor and then they become “floating shelves” 🙂
This is the part where the “faux floating” comes from. I knew I wanted the look of floating shelves so that the brackets didn’t show. Especially since the space to hang them was so small, I wanted a clean look.
But I also didn’t want to take on the hastle of trying to make real floating shelves. They are more complicated and I don’t have the woodworking patience to make those yet. Which means I would have to add it to my “hubby do list”. Which would also mean waiting for him to have time. I definitely wasn’t interested in that 🙂
So that is where these awesome corner braces come in. I used these Everbilt stainless steel ones so that they wouldn’t rust since they will be in a bathroom.
These heavy duty metal braces can be mounted “upside down” in order to create the faux shelf effect. This is what it will look like:

Once you have marked your studs, take your first bracket and line up the pencil line with the bottom of the bracket. ( the vertical line marking the stud should be visible in the middle of the bracket holes ) With a pen, mark the middle of the hole.
Pre-drill

Step 1 / Take your drill and with a 1/8″ drill bit, drill 1 small pilot hole. ( You are not drilling the second just yet because there is one more step beforehand to make sure the bracket is level.
Step 2 / Replace the bracket and insert the screw into the 1 pilot hole. Tighten most of the way, but not completely just yet.
Step 3 / Grab your level and place it on the side of your bracket. ( The level should be vertical like the bracket ). Adjust the bracket until the level is showing it is straight vertically. Once you have determined that, mark the hole center with your marker again.
Step 4 / Repeat what you did with the first hole. Pre-drill and then insert the screw. At this point you can tighten both screws all the way.
Double-check your work
Before you repeat these steps with the second bracket, DOUBLE CHECK!! Even though you have been using a level, it is worth being extra certain before hanging the second shelf bracket. Because if you are just the littlest bit off, you will have to move the entire height of the shelf by several inches in order to re-drill.
Have one person line up the second bracket where it should be placed according to your line. Hold it steady. The second person should gently place the shelf on top both brackets with the level resting on top. If the bubble is in the center of the level, you are good to go; go ahead and repeat what you did with the first bracket. If not, now is the time to adjust until it is showing it’s level.

As soon as it shows that. Hold the bracket steady and mark both holes with a pen. Then at that point you are ready to move on.
Now you will repeat these exact steps on the second bracket. This is where the second set of hands will really come in handy.
Step 4 / Attach shelves to brackets

This is the second part of the process that will help to have that second set of hands.
Step 1 / Now that the brackets are up, get that shelf up. Make sure it is in the right place. While one person holds it steady, the second should use a Sharpie to mark all holes on the underside of the shelf where it will attach.
Start with the top shelf! This way you have plenty of room to drill below without it being too awkward.
Step 2 / Using a 3/32″ drill bit, pre-drill your marked holes on your shelves. Make sure not to go too deep. You are just drilling enough that when you insert the screws, it doesn’t crack the wood.
Step 3 / Replace the shelf, and line up your pilot holes with the brackets. While one person holds the shelf down so it doesn’t move as you drill upwards, the other can insert the screws.

This hex drive magnetic bit holder will save you a lot of headache. It attaches to the power drill and holds the bit tip using a magnet. This makes it easy to swap bit tips ( for different screw heads ). When you go to start screwing it in, extend the tube so that it goes around the screw. This helps keep the screw going in straight. It also allows you to screw it one handed and not have to hold the screw steady. When you aren’t really comfortable (or even if you are) with a drill, you want this.
Step 4 / Repeat all these steps with the bottom shelf. Clear out your tools, clean up your mess and you are ready to go on to my favorite part!
Step 5 / Decorate

If you had been wondering how theses are supposed to be considered “floating shelves” when the bracket obviously shows from the top….now you will see why 🙂
With the creative placement of decor on the shelves, those brackets will “dissapear” and you will be left with the clean look of floating shelves without all the extra work 🙂
So in all honesty, this is my favorite part! I don’t absolutely love the building/mess part. I love finding the fun things to arrange on the shelf and determining how to best organize the shelf so it’s practical as well as beautiful 🙂
Like these
XO,
Morgan

Comments are closed.