For the 1,000,000.00th time…..I asked you to go brush your teeth. Ever feel like you are asking your kids multiple times to do tasks that get completed every single day and shouldn’t need a reminder? The daily tasks such as brush teeth, comb hair, make your bed and all the others? That combined, after asking multiple times for each, you feel like you are about to pull your hair out? This responsibility chart has helped simplify and organize our daily routines and make the days more relaxed.
I realized I was asking my kids the exact same things, all day, every day. It was exhausting, and we all were frustrated. I knew I wanted to do some sort of responsibility chart for them, not a chore chart. For our family, we felt that these jobs were daily responsibilities as being apart of our family, not chores. We wanted to place the emphasis on the positive, and help the kids learn to take responsibility for these daily tasks without us repeatedly asking.
Being that this chart needed to be in a central part of our home in order for it to be effective, and I would have to look at it all day, everyday….my work was cut out for me trying to find the perfect solution. I knew that I wanted something that was fun for them to interactively use as they accomplished a task, colorful enough to catch their attention as they walked by; helping them remember to check it, and yet achieve the high bar of something that I would want on full display in the house.
I fully understand that a home with kids often times means a lot of colorful plastic, chaos and noise. However, being that I work from home, and spend a majority of my day at home, I am always searching for options that are both fun and functional for the kids, as well as visually appeasing to me. So whenever possible I try to achieve that balance so that I feel relaxed at home vs. feeling like I’m living in a daycare 😉
Step 1 / What daily responsibilities are important in your family?
First things first. Determine what daily responsibilities are important to you and your family to help simplify your days. Think morning routine, after school routine, and bedtime routine for during the week. Then what sort of responsibilities do you like to happen on the weekends? List them all out. All my kids are not school aged, however, I chose to design this chart towards kindergarten age kids and up. My 4-year-old still has most of the same routines, minus a few such as homework time. Then as the kids grow and jobs change, I will make necessary adjustments and add new magnets.
Step 2 / Organize your board
Second. Decide how you want your chart organized. Do you want both a morning and afternoon/evening routine section per kid? Do you want a separate group of magnets for morning and evening? For us, I felt it was simpler to have a separate space for morning and evening (per kid). We also used a separate group of magnets for morning and evening as well. This has allowed the kids to take responsibility and reset the boards just once a day rather than remember to reset before the afternoon and evening routine began. Now they reset their boards every morning first thing when they get up and walk into the kitchen.
Step 3 / Designing your board
Now that you have decided what types of responsibilities are important to simplify your daily routines, and how you want to lay out your board…..now starts the fun part. Designing it! First off, choose what kind of board you want. I love things that are multi-purpose. I chose a magnetic blackboard because:
1. It would look good in my kitchen
2. It was big enough to hold the magnets we needed, and fit perfectly on the end of my lower kitchen cabinet
3. Whenever we reach the point that kids are old enough, and they don’t need reminders then I can re-purpose it for something else.
What you will need
Now that you’ve figured out what you need to include on your responsibility chart, it’s time to gather your supplies and start the fun part!
This post contains affiliate links, which means I may earn a small commission if you purchase through them—at no extra cost to you. Your support means the world and helps keep this blog running. I only share products we actually use and love, and I’ve included them here for your convenience. Thank you for supporting our journey!
Supplies
- Some sort of magnetic board
- Chalkboard markers to draw on the board
- Print out of all the responsibilities (multiplied by the number of kids)
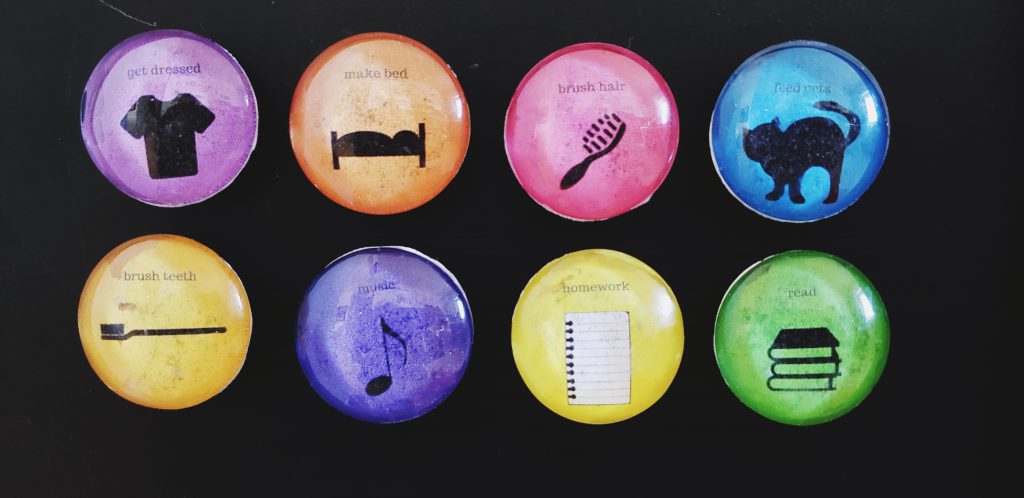
- Magnets with all the responsibilities (supplies for these are listed on my other post)
- Ruler
- Level -for hanging board
- 2 picture hangers-for hanging your board
- Hammer ( I love this one! I got it for a gift when I went to college and it is perfect for all those quick, home DIYs ).
Making your board. Now that you have all your supplies, its time to get to work and get your board made!

Step 4 / Making your magnets
First off, lets get your responsibility magnets made! You will need to print out either images or words of what responsibilities you want to implement in your family. Once you have those printed, jump on over to my other post which will walk you through step by step on how to make those magnets.
Choose what works best for you; however here is what I chose to do in regards to the magnets. I made just enough for the responsibilities that I’m looking for my kids to be able to do alone at this moment in time. As they master this group, or as their days change, I will make more magnets. I figured it would be easier to come back to my list and add more as I need them, rather than try and anticipate what we will need, make ahead of time, and then try and remember/find where I put them 🙂 But you do what will work best for you!
Step 5 / Design your board
Start by designing and decorating your board with the chalkboard markers. Using a ruler, and the chalkboard markers begin drawing your board on a flat surface. Make a mistake, not to worry! Just grab some Windex, wet a paper towel, and wipe it off! I started with dividing my board in half. One section for each kid. Then each half I divided in half again to make a section for morning and evening for each kid.
After the board was divided, I added the girls name on their sections and then labeled the other parts that would help it stay organized. Finally, add whatever decorations you want to make it fun.
Step 6 / Hang your board
Grab your hammer, picture hanger hooks and level and get that board hung!

Implementing your responsibilities chart
Now that your board and magnets are done, it’s time to implement the chart, and start gaining control of your mornings and evenings again!
Instead of doing it all at once, I chose to gradually introduce the kids to the board and how it works. I started with just a
We started on a Sunday by discussing the new board and how it worked. They saw all the
How it works
Every morning when the kids first get up, the know to go straight to the board and take a look at their board. Want to play, read or watch a device? A.M board has to be completed first.
Goal
The goal is that they learn to look without being reminded. However for the first week, I helped with the transition with using reminders.
Completing the tasks
In the beginning, at the end of every day that they completed all of them, there was a “reward.” Think positive reinforcement. It could be a piece of chocolate, a small toy they get to pick out from a dollar store basket or staying up 5 minutes late that night for “special time.” It needs to be immediate, that same day. Think about what follows your parenting style and is a fun incentive for your kids.
Arguing, not completing a task that day? No problem. No consequence, just try again the next day. The second week, try and cut back on reminders. By the 3rd week, there shouldn’t be any reminders. At this point, we moved rewards to 1x a week. If they made it through the week we did something special to celebrate, whatever that may be to your family. The goal is to make it fun so they have a reason to continue following through.
Even now, we still have a reward system in place. Every week that they can successfully complete their boards, we celebrate that. For our kids, we’ve found that this keeps them interested and is an incentive for them to continue. We feel like that is a small compromise in exchange for less asking and complaining 😉
In all honestly, there are those weeks that are insane, or while on vacation that we have gotten off. But, in all honestly, that’s part of life. No biggie. Just start at the beginning, sit down and communicate as a family what you are looking to do with the board again, make sure everyone is on the same page, and jump right back in 🙂
What ideas or improvements do you have for how you help your kids to complete daily tasks without nagging and loosing your mind? Want to share with us?!?
XO,
Morgan


